Mooove
- 1.6 Add a 2D sprite entity to the project
Writing games relies heavily on libraries for multimedia processing. Reading/writing image formats, windowing, manipulating graphics and controlling windows are all complicated tasks that you certainly don't want to be reinventing with every new project.
Unity is a full 2d/3d game framework, which includes:
- Low level libraries
- High level features such as collision, physics, AI
- Tools to make handling assets (art, sounds) easier
- A prescribed approach to code organization
- A unified development environment (editor, debugger, profiler, other tools)
In these initial labs, we will be not be using the high-level features available in the engine, as we are going to go over the fundamentals of physical simulation code. This is similar to how you write your own stack or queue once to understand it, before using the standard ones from there on out.
In the project directory is a folder called Assets. This is where you will store your images, models, code and all other parts of your project. Download some (clean) image to the Assets folder, and note how it shows up in Unity in the Assets panel. Click on it there and in the inspector window you can see the settings that Unity used to import the image.
The Unity IDE follows many conventions from 3d modeling programs, allowing the user to manually build a scene by dragging in assets. This is convenient for quickly setting up and adjusting a game environment, although it runs into limitations as a model when the games get bigger and more dynamic.
In the main Scene window, you can see a white rectangular line. This is the part of the scene that will be visible when the game runs, called the viewport. Drag the image you got from Assets into the Scene window. If it's too big relative to the viewport, click on it over in Assets and raise the Pixels Per Unit in the import settings.
Once it's a decent size, click the play triangle at the top middle of the IDE to run your "game". Click it again to stop.
What'd We Just Do?
In Unity terms, you created an entity in the scene that displays a 2d image. Notice that the image also appeared in the upper left hand Hierarchy pane, which is a tree view of all the entities in the scene. If you rename it there, you're not renaming the image that you imported (in Assets), you're renaming one specific entity in the scene that displays that image. Drag the image from Assets to Scene a second time and you'll see that it creates a second entity.
- 1.7.1 Add a script component to the entity
- 1.7.2 Make the sprite move with velocity and time
In order to add functionality to your game/lab/demo/thing, you attach script components to entities. There are a number of ways to do this in the IDE, here's one:
- Right-click in the
Assetspane, selectCreate->MonoBehaviour Script - Rename the script
Player - Double-click on the script to open it in your code editor
In that script file is a single class that inherits from MonoBehaviour, which is the base class for all Unity script component functionality.
If necessary, change the name of the class to match the name of the script file, Player.
Unity automatically creates two methods for you to implement, Start and Update. Before we get into the details of how this all works, try this:
- Add
Debug.Log("Starty!");to theStartmethod - Add
Debug.Log("Updating!");to theUpdatemethod - Back in Unity, drag the script from
Assetsto the first entity in the scene - Press the run arrow and then press it again to stop
What you should see is a bunch of debug messages spit out to the Console panel - one Starty! and lots of Updating!
What'd We Just Do?
Games (all interactive applications, actually) run a main loop, a while(true) that just keeps going until the game is done. In that loop, the program does three things:
- Check for user input since the last iteration (frame)
- Update the world based on that input and the simulation rules
- Display the world
Unity, like most frameworks and engines, hides that main loop from you. Instead of managing it, you write those script components and attach them to entities. Each time through the main loop, the engine calls Update on each active script in the scene. The engine calls Start on each active script roughly at the beginning of the game, although it's not quite that simple.
To implement your game rules, you put code in Start that you want to happen at the beginning to set things up, and put code in Update that you want to happen every frame (that's the part that updates the world based on the simulation rules and user input).
Movement Implementation
Our entity isn't very interesting at this point, because it just draws itself in the same place every frame. Games, like traditional animation, work by showing the user a rapid sequence of images that change slightly. Let's make that entity do something.
The class MonoBehaviour that we inherited from contains, among other things, a reference to a component called transform.
The transform component is on every entity and stores the position, rotation and scale of the entity within the scene. In the Unity editor, if you click on the entity you can see the transform component in the Inspector pane on the right. If you edit those numbers, you can move the entity around, rotate it and scale it.
In our Player class methods, we can access transform, because we inherit it from MonoBehaviour. Try put this code in Start:
transform.position = new Vector2(0, 0);
When you run the game, Start will be called and the entity will be positioned in the center of the viewport. The position is a Vector2, which has and x component and a y component.
Note the Unity's Vector2 and Vector3 are C# structs, not classes, meaning that they are passed by value (copied). The x and y data members are immutable, so you can't edit them (which is why we set it to a new Vector2 above).
Go Forth!
How to make things move in a consistent and physically realistic way? Turns out it's easy! Read these two references and come back:
Reference: Movement and Numerical Integration
Based on that, we need to add a velocity vector to our class. You can do it as a data member inside the class:
Vector3 velocity = new Vector2(0.1f, 0);
We use a Vector3 because that's what transform.position is, and while Unity is happy to copy a Vector2 to a Vector3 (it just zeroes out z), other operations will complain at us.
The f indicates that the number is a float rather than a double. Graphics are one of the few places where that kind of optimization matters (allows more data to be moved between the CPU and GPU).
Also, notice that C# is cool with you allocating member objects outside methods - it happens whenever an object is created, at the same time that the constructor is called.
In Update, add the velocity to the position every frame:
transform.position = transform.position + velocity;
Run the game and the entity moves! However, since we're adding a constant (0.1) every frame, the speed of movement is dependent on the frame rate (i.e. how fast the computer is). That's bad! We want to move at a consistent speed in real time, so we use Euler integration as discussed in the references. The amount of time since the last frame is given to us by Unity as Time.deltaTime:
transform.position = transform.position + (velocity * Time.deltaTime);
(You'll want to increase your speed from 0.1 to around 5 to be reasonable).
- 1.8.1 Set up Unity's new Input System
- 1.8.2 Update Player.cs to separate speed and direction
- 1.8.3 Connect user input to movement
Every frame, the game has to check what the user is doing and apply those actions to the simulation. Unity has evolved from the old Input
class to a new, more powerful Input System that provides better control mapping and device support.
In your project Assets, you'll see InputSystem_Actions.inputactions. Double click on it to open the Input Actions Editor window and see
how this systems creates an abstraction layer that makes handling different input devices and keybindings consistent across games.
In the Inspector window, check the box Generate C# Class and it will automatically generate a file/class called InputSystem_Actions.cs
in your project Assets. This class gives you programmatic access to the input system from your script components.
This approach allows you to move vertically, horizontally, and diagonally (eight possible directions) based on the WASD keys, while properly handling timing with Time.deltaTime.
Instead of polling for input every frame, the new Input System uses an event-driven approach. You subscribe to input actions and receive callbacks when they occur. Each frame, you read the current input state and convert it to velocity for smooth movement.
Relevant Unity elements
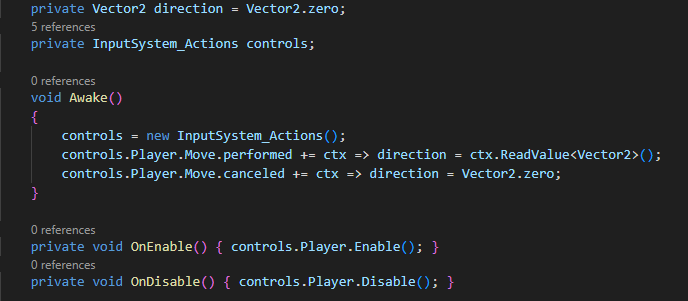
Input Actions: Include using UnityEngine.InputSystem in your script. Set up the following code to link to the input system and
respond to Player.Move events (which are bound to WASD and arrows). The anonymous callback functions respond to the performed and canceled events to update your direction vector with a normalized (length 1.0f) vector pointing horizontally, vertically, or diagonally.
Converting input to velocity: In Update, use direction and speed to update velocity. Velocity is then integrated using Time.deltaTime
just as before to update position.
- 1.9.1 Map mouse click to move-to-this-location
- 1.9.2 Move entity to clicked location over time
Use the same numerical integration approach to implement click-to-move functionality. When the player clicks somewhere on the screen, the entity should move to that location over time at a constant speed.
Click-to-move requires translating mouse click coordinates from screen space to world space. Screen coordinates (like 1680x1050 pixels) don't match world coordinates (like -5.2, 3.8). You need to convert the screen position to a world position, set that as your target destination, and move towards it each frame.
Each frame, calculate the path from your current position to the target destination. Use that path direction and your desired speed to set the velocity vector, which gets integrated normally using Time.deltaTime. The entity will smoothly move toward the clicked location.
Relevant Unity elements
Click action callback: Using the Input Actions system, subscribe to the Attack action (which is bound to left mouse click). This is the same callback pattern we used to subscribe to movement keystrokes. Inside the callback method, get the pointer position using the static reference
Pointer.current.position.ReadValue() which provides the screen coordinates of the click.
Camera.main.ScreenToWorldPoint: Converts screen coordinates to world coordinates. The main camera projects the 3D world onto the 2D screen. This method reverses that projection to find the world position under a screen pixel. Returns a Vector3 with the Z value set to the camera's Z position.
You want to use a Vector2 for your target destination, or set the Z coordinate to the Z value of the flat 2d world (otherwise your entity will be moving towards the camera, which messes with speed even though you can't see it).
Vector subtraction and normalization: Calculate the direction from your entity to the target using destination - transform.position. This gives you the path vector. Use .normalized to get a unit vector (length 1.0) pointing in that direction, then multiply by your desired speed to get the velocity vector. See Reference: More 2d Vector Operations for detailed information on these calculations.
Stopping condition: Since discrete movement rarely lands exactly on the target point, you'll need to detect when you're "close enough" and stop. Check if the distance to the target is less than some small threshold value to avoid jittering at the destination.