Tile-Based Pathfinding
A short clip of the completed lab in action.
Prior class video explaining this module.
Start Here
Grab the repo first! There is starter project/code in there.
https://classroom.github.com/a/s5xatkpL
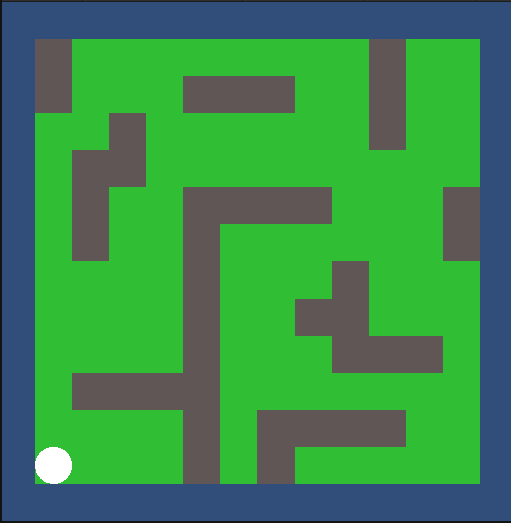
Here's what you should see when you run it right out of the box.

The initial code has several things set up for you
Editor configuration
- Entities: camera, agent, guard (disabled), and the
MapManager - Prefabs for the tiles (grass, dirt) and handy debugging labels
- Colliders for the agent/guard and the guard's awareness of the agent
Code
MapManager: methods to dynamically create a tile-based map and for pathfinding searchmap.txt: a text file specifying the location of grass vs. wall tilesAgent: methods for moving the agent using pathfindingGuard: methods for chasing the agent using pathfindingAwareness: support to use collision to detect awareness of the agent
Stage 1: Tile Me
In this stage, you will complete the below functionality:
- Read in the text tile map file and dynamically instantiate tile entities (grass and walls) in the world
On startup, the tiles should be placed in the world according to the values in map.txt. It doesn't do anything else at this point.
Why Tiles?
Games need some way to store the positions of all the background stuff, commonly called the "map". Tiles are a common approach in 2d because they reduce memory usage and art effort. A good tileset is hard to make, but once you have it, you can easily create infinite map variations by moving tiles around.
The simplest form of this is grid-aligned tiles. With these, the map format is a simple array of integers indicated which tile goes there. Look at the map.txt file to see what we mean. The "0" values are grass that you can walk on, the "1" values are walls that you can not.
Unity has a built-in tile editor that lets you graphically position tiles, save the map array, and load it later. For this lab, we'll do it ourselves to see how simple it is.
Lay of the Land
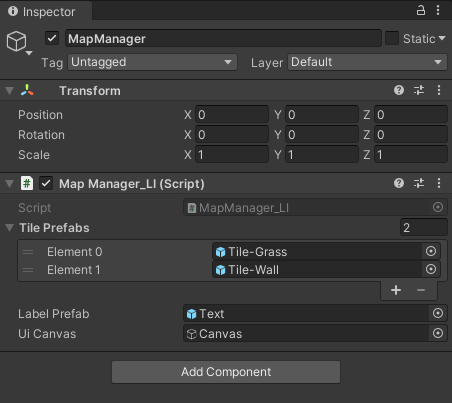
First, click on the Tile-Grass prefab and look at its components in the inspector window. Prefabs let us set up an entity template and then create any number of instances of them at runtime (during game loading, generally).
The MapManager script has a number of public vars as shown below that give it references to the two (or more) tile prefabs. It also has references to a text label prefab and the UI canvas so that it can create and position debugging labels over tiles.
Now to Work
Open the MapManager script. Up at the top, note the definition of the grid_cell structure. That will hold per-tile data that we need to implement our pathfinding algorithm. In the MapManager class, there is a class-level variable called _map that is an array of those grid cells. This array is very important, so keep it in mind.
A little further down, the arrays _tiles and _labels are similar data structures used solely for debugging purposes (visualizing the pathfinding search).
Now read through the method readMapfile in MapManager. The code should look familiar because reading in a text file and looping over the results looks roughly the same in any language and environment. For each value in the file, it creates a tile at the right position in the world, sets the isBlocked value for that cell in the _map array, and then sets up debugging for that tile. There are two significant errors noted in comments that you need to fix to finish this stage.
Stage 2: This is the Way
In this stage, you will complete the below functionality:
- On-click finding the shortest path
What is Pathfinding?
Pathfinding is, along with awareness, one of the most basic, fundamental elements of game AI. Entities, whether a click-to-move player or an NPC, must be able to move around obstacles to have any semblence of intelligent behavior. Pathfinding has been studied quite extensively because it also impacts robotics, supply chain logistics, and other fields. The basic concept is an exhaustive search from the starting point until you reach the end point. Searching on a simple grid makes it easier to understand, but the algorithm really doesn't change that much with non-square cells or 3d. More efficient algorithms use heuristics to search along more likely paths first.
In the video above, every time we click the system generates and displays a new path from the agent to the cell we clicked on. The blue cells are the shortest path that it found. The gray cells are the ones that it considered. The green cells it didn't have to look at.
A*
The A* algorithm (pronounced "A star") is straightforward in concept but has a good amount of implementation overhead (recall that _map array). Rather than have you implement it, I'm providing my implementation with a few things missing. This way you can study the code and demonstrate understanding by finishing it.
Be warned, debugging an algorithm in a real-time environment like this is challenging. If you just start trying changes without understanding, you'll likely run yourself into a very deep hole. Follow the steps below and don't skip.
The algorithm
You can find no end of explanations of A* on the web, it's a decades-old algorithm used all the time. We'll go through it in class as well.
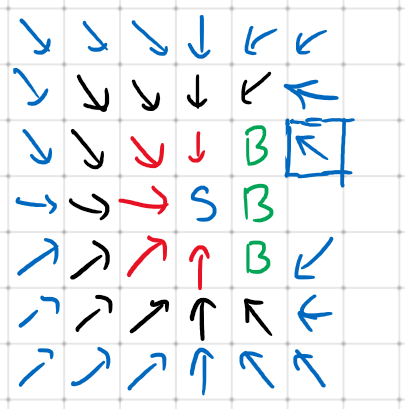
A* is based on a breadth-first search. Imagine that you need to find a path from the blue "S" to the blue square below, but the green "B" squares are blocked. Breadth-first is an exhausive, brute-force approach.
- Check all the squares that neighbor the start square (red). If any are the end, done.
- Check all the squares that neighbor those squares (black). If any are the end, done.
- Keep going until you get there
The key is to keep track of the "parent" of each square - the way back to start. The red arrows are all the one-step paths. The black arrows and two-step and the blue arrows are three-step. When you reach the end goal, you just follow the arrows back to start and there is your path.
You can easily see that this is guaranteed to find the shortest path, but very inefficiently. Any person would not check all those squares to the left.
The key to A* is the cost values for each cell. While searching, we calculate:
G: the actual cost to get to a cell (distance travelled, just like the one-step, two-step, etc)H: the estimated cost from a cell to the endF:G + H, the estimated total cost of the best path through that cell
If H is a good estimation, then we can prioritize checking the cells with the lowest F values, and the result is what you saw in the video. Note all the green squares that weren't checked. (The number on each cell in the video is G, the cost to get to that cell from the starting point. You could easily change it to display H or F).
The complete algorithm is provided below.
Implementation
Implementing A* requires maintaining the following data:
open list: the list of the cells to check nextclosed list: the list of the cells that have already been checked and don't need to be checked againG, H, F: the search values for each cellparent: a reference back to the parent cell in the search process
You also need easy ways to determine if a cell is on the map and if it is blocked.
Here is the compelte algorithm:
- Add the starting square to the open list.
- Repeat the following:
- Look for the lowest F cost square on the open list. We refer to this as the current square.
- Move it to the closed list.
- For each of the 8 squares adjacent to this current square:
- If it is not walkable or if it is on the closed list, ignore it. Otherwise do the following.
- If it isn't on the open list, add it to the open list. Make the current square the parent of this square. Record the F, G, and H costs of the square.
- If it is on the open list already, check to see if this new path to that square is better then what is already there. (A lower G cost means that this is a better path.) If so, change the parent of the that square to the current square, and recalculate the G and F scores.
- Stop when you:
- Reach the target square to the closed list, in which case the path has been found, or
- Fail to find the target square, and the open list is empty. In this case, there is no path.
- Working backwards from the target square, go from each square to its parent square until you reach the starting square. That sequence is your path.
Digging In
Most of the code for pathfinding is already in MapManager. The method getPath is the public call that returns a list of Vector2 waypoints to get you where you need to go. You need to look at all the methods and data sructures there in the class to understand how it is implemented.
There are two places in the createPath method where I removed crucial code, marked with comments. Your job is to correctly finish those parts.
Eventually, you will uncomment the code in Agent that calls pathfinding on-click. DO NOT DO THIS UNTIL YOU UNDERSTAND AND START FIXING THE PATHFINDING CODE. As the code stands, you will kick off an infinite loop and have to kill Unity and restart it. Not a good debugging cycle.

Stage 3: Agency
In this stage, you will implement the below functionality:
- Agent moving on click along the generated path.
Movement, again
The pathfinding call returns a List of Vector2 waypoints to get to the desired location. Finish Agent.Update to use _path to move as described in the comments. It's the same move-to-a-point that we did back in lab01, only there are multiple points in sequence to move to.
To avoid cutting corners, we still need to deal with collision and overlap. I already provided the code to do that there in Agent.Update, you just need to enable it.
Stage 4: Guards! Guards!
In this stage, you will implement the below functionality:
- Guard chasing the agent using awareness and pathfinding.
Not the Best and Brightest
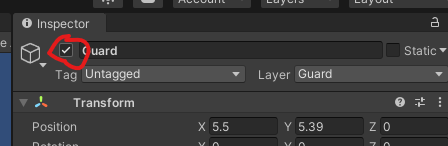
Activate the Guard entity in the scene.
As you can see below, he is dumb. He uses the Awareness circle collider to "see" the agent. But as soon as the agent leaves that circle of awareness, the guard heads back home, which leads this degenerate behavior.
Train em' Up
There are any number of ways that you might change the guard behavior, and that will be something to explore in game04. For now, modify Guard.Update so that instead of heading home as soon as he loses sight of the agent, the guard is smart enough to finish out the path that he already has. That will take him to the last spot he "saw" the agent, and if he doesn't reengage by then, then he leashes back home. This is much nicer behavior, as seen in the final version.
Hint: you're going to need to keep the path between frames, not repath every frame like it does now.